Thornmarch (Extreme) was added in patch 2.2 of the A Realm Reborn expansion.
Thornmarch (Extreme) becomes available at level 50 as part of the “The King Lives” quest, which is given by Urianger – The Waking Sands (X:6, Y:5).
The trial has a minimum ilevel of 80 to enter and rewards you with:
Allagan Tomestone of Poetics: 20
Introduction
Thornmarch Extreme is a primal that was added in patch 2.2 and rewards an ilevel 100 accessory. The primal becomes available upon completion of the quest “On the Properties of Primals”. The quest for Thornmarch extreme is called “The King Lives”, which is given by Urianger in Western Thanalan, The Waking Sands (X:6, Y:4). The fight has a minimum ilevel requirement of 80 but it is recommended to be a bit higher than this to make things smoother.
If you have not beaten it before then it is recommended to read and understand this guide and then join some learning parties via PF or DF. You are unlikely to win in these groups but it will get you familiar with the mechanics of the fight and give you the confidence to join more experienced parties that will get you that important win.
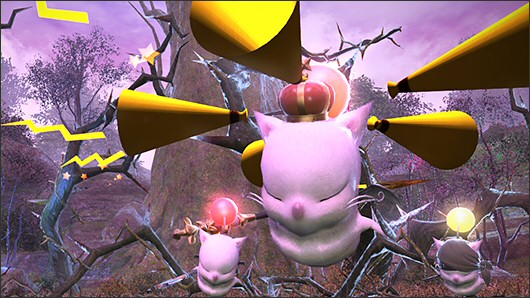
Moogles
There are eight moogles to defeat in this fight, with one being the Good King Moggle Mog XII himself. Unlike with Thornmarch Hard Mode the kill order is not important as the fight has a different mechanic to consider. The moogles are described below:
Whiskerwall Kupdi Koop (PLD) – This moogle will use an attack called Spinning Mogshield, which is an AoE centred around himself. Also capable of charming players.
WoolyWart Kuqpu Kogi (RNG) – Be ready to run when you see a crosshair above your head; it means WoolyWart is about to hit you with Eagle Eye Shot. This is a highly damaging attack.
Pukla Puki the Pomburner (BLM) – Capable of casting Flare but players are able to stun and silence it.
Pukna Pako the Tailturner (THF) – This guy will randomly target a player and then run up to them and start attacking.
Ruffletuft Kupta Kapa (WAR) – Be ready to dodge his Steel Cyclone AoEs.
Furryfoot Kupli Kipp (WHM) – This guy will cure other moogles as well as use Holy.
Puksi Piko the Shaggysong (BRD) – He will buff the attack rating of other moogles via a song, and is also capable of doing AoE damage centred on himself.
Good King Moggle Mog XII – He will inherit an ability from each moogle once it has been defeated. He will also use Momento Mori during the phase change and throughout phase 2. The damage is dependant on how many moogles are alive. You need to kill as many as possible in phase one to reduce this damage.
Introduction
The basic idea of this fight is that you damage the King Moogle via damaging other moogles. Basically, when a moogle dies the king will sacrifice his HP to heal all of the moogles. Therefore the more damage you deal to the moogles before killing them the more HP the king will lose when healing.
Phase 1
In phase 1 only the king moogle is present, so this is a simple DPS phase where you bring his HP to 90%. He will not do much of anything to worry about in this phase, but be ready to dodge his line attack.
Phase 2
All of the moogles now spawn. Just like with the hard mode fight you can only control hate on the PLD and WAR moogles. One tank should grab the PLD and one tank should grab the WAR. One of the tanks should also grab the king. It doesn’t matter which as there is a mechanic that forces a tank swap. Standing near the king causes him to give a moogle near him a stack that increases its damage. Generally you don’t want to reach 4 stacks so it is important that the tank that did not have the king now takes him, so that the stacks start applying to the other moogle.
The group needs to take special care of the BLM moogle as it can cast Meteor. This should be interrupted by the DPS attacking it.
You also need to keep away from the middle of the arena because three moogles can form a triangle between them which causes a lot of damage if you are caught in it. This attack is called Delta Strike.
You should aim to bring all moogles in the arena (minus the king) to around 10% of their HP in this phase and then kill one of them. This will bring the king to around 45% of his HP.
The king will yell every so often from phase 2 onwards, and this means two special attacks are about to be used by the moogles. Some always go off together while the rest are at random. You should know how to deal with each of them. The special attacks are listed below.
Moogle-go-round & Pom Holy: This is the most annoying one to deal with as it has the highest risk of death. The WHM will use Pom Holy so you need to stun this, all the while moving as far away from Moogle-go-round as possible.
Charm: Charm is the next most dangerous special ability and takes the form of three people getting charmed. It will be the three people closest to the PLD so healers should avoid standing near it. Healers need to be on watch to Esuna the charm before the charmed players run into poison and die.
Mog Rain of Death: The RNG will target 3 people (visible with icons above their heads). This is fairly easy to deal with as it is a simple case of taking the damage and having it healed.
Hate Reset: The PLD and WAR moogles will reset their hate, causing them to run off. The group should avoid healing or dealing damage until the tanks have them back under control, which should not take long.
AoE Attack: This one is nothing to worry about, it will deal damage to everyone but not much.
Phase 3
This is the same as phase 2, except the moogles are stronger. The idea is the same in that you bring all of the moogles to around 10% before killing one.
After you kill a moogle in this phase they will use Pom Meteor. This cannot be interrupted like the BLM’s Meteor and it will deal a lot of damage to everyone. You should group up for some big AoE heals.
Phase 4
This is the final phase and again you must bring all of the moogles to 10% before killing one. The moogles are stronger than the last phase now too.
This time when you kill one of the moogles the king will cast Pom Flare. You will need to kill all of the other moogles before this goes off otherwise it is a wipe. If you manage this then you win.
Thornmarch (Extreme) Loot List
Below is a listing of all loot for the trial Thornmarch (Extreme).| Items () | Stats/Compatibility/Description | Level | iLvl | |
|---|---|---|---|---|

|
Faded Copy of Good King Moggle Mog XII | Timeworn pages of sheet music containing the full score for Good King Moggle Mog XII. | 1 | 1 |
|
|
Faded Copy of Good King Moggle Mog XII | Timeworn pages of sheet music containing the full score for Good King Moggle Mog XII. | 1 | 1 |

|
Kingly Whisker | This whisker, imbued with the majesty of all moogle monarchs past and present, once belonged to Good King Moggle Mog, Twelfth of His Name. | 1 | 90 |

|
Ribbon of Aiming All Classes | Dexterity: +18, Skill Speed: +19, Critical Hit: +13, Vitality: +18 Chest: Good King Moggle Mog XII | 50 | 100 |

|
Ribbon of Casting All Classes | Intelligence: +18, Determination: +19, Direct Hit Rate: +13, Vitality: +16 Chest: Good King Moggle Mog XII | 50 | 100 |

|
Ribbon of Fending All Classes | Vitality: +18, Tenacity: +19, Determination: +13, Strength: +18 Chest: Good King Moggle Mog XII | 50 | 100 |

|
Ribbon of Healing All Classes | Mind: +18, Determination: +19, Piety: +13, Direct Hit Rate: +4, Vitality: +16 Chest: Good King Moggle Mog XII | 50 | 100 |

|
Ribbon of Slaying All Classes | Strength: +18, Direct Hit Rate: +19, Determination: +13, Vitality: +18 Chest: Good King Moggle Mog XII | 50 | 100 |