
Amdapor Keep was added in patch 2.0 of the A Realm Reborn expansion.
Amdapor Keep becomes available at level 50 as part of the “Ghosts of Amdapor” quest, which is given by Nedrick Ironheart – Western Thanalan (X:12, Y:14).
The dungeon has a minimum ilevel of 45 to enter and rewards you with:
Allagan Tomestone of Poetics: 20
Amdapor Keep is not part of the main story and is a side quest given by the NPC Nedrick Ironheart in Vesper Bay (Western Thanalan) upon completion of Aurum Vale. In order to get the quest you must have completed the main scenario. The quest is given at level 50 and the dungeon is located in South Shroud. There is also another quest which gains entry, given by the Ul’dah Grand Company NPC upon completing the Dzemael Darkhold quest. This dungeon is also a requirement as part of the relic quest; A Relic Reborn.
The Amdapor Keep dungeon has three sections, each featuring a tricky boss encounter at the end. Since this dungeon can be difficult for players who are new to it we decided to turn the page into a strategy guide, as we plan to do for all difficult dungeons. In patch 2.1 the difficulty of the dungeon was reduced but the guide is still relevant.
Ground Floor
On the Ground Floor there is not a lot to worry about, just work your way through the trash mobs towards the boss room. As with almost all trash in this dungeon it is best to AoE burn them down for speed rather than sleep and kill one by one. Once you kill the group of red guys next to the barrier the room will open.
To fight this boss you should begin by blasting down the Lunatic Priest. Ignore the Psycheflayer (main boss) when it spawns and just kill this guy as fast as possible. If your DPS is good enough you can kill it before the main boss spawns any stone creatures.
Now you will turn your attention to the Psycheflayer, who will spawn a new stone creature every so often. Simply kill these as fast as possible and then turn your focus back on to the main boss. After a couple of stone creatures the tank should move the boss towards the side of the room because eventually the boss will summon a huge stone creature who walks up and down the room. You do not want to be near that and he will use an extremely wide AoE which will kill you if hit. You do not have to try kill this guy. To complete the fight just keep killing any stone adds while DPSing the boss in-between. Eventually he will go down.
Second Floor
The trash mobs on the second floor are nothing to worry about so just make your way to the boss room. Some of the mobs can be skipped if they are far enough away on certain corners but apart from that you will kill the majority of the map. Enter the Demon Wall room and prepare to fight.
This boss will kill you and wipe the party if you do not know what you are doing. The fight involves an awful lot of movement and if you are a caster you need to know when you can cast your spells without having them interrupt. Fortunately the boss uses the same attack pattern for the duration of the fight. The floor will change colour throughout the fight and you do not want to be standing on the dark stuff because it will inflict lots of damage. You basically move right then left depending on what state the floor is in. On where to stand, it goes like this:
Side > Middle > Side > Middle > Repel
Repel is an attack he uses after the second set of floor changes and this will knock you back quite a few yalms. If you are stood on the sides when he uses this you will be knocked off the floor and killed instantly. You can not get back to the fight from down there. This pattern above will continue for the entire fight.
After the second Repel two bees will spawn, and there are two strategies for this. The first assumes you are killing them, in which case have someone use a limit break on them and finish them off as quickly as possible. The second strategy assumes you have high DPS (unlikely if you need this guide). If the Demon Wall is down to around 1/3 health when the bees spawn then you can just ignore them and DPS down the boss. This is more for an experienced group.
Third Floor
The third floor has some trash mobs which can be tricky. There are 3 Succubus creatures in the area and you need to be careful with these, especially the third one. Try to pull them on their own and kill them as fast as possible as they have high damage AoE attacks focussed on a location rather than a person. The third one is particularly tricky as it comes with 3 other monsters. You should sleep what can be slept on this pull and then burn down the Succubus. You can then AoE burn the rest down if you wish.
The boss on this floor (Anatoboga) has some interesting mechanics which cannot be ignored, if you are careless you will die. First things first, the tank should take the boss to the far right corner and point it so that its back is facing the middle of the room and the ranged damage dealers should be stood next to the near statue on the right side.
Begin by DPSing Anatoboga as fast as you can until he starts casting Imminent Catastrophe. You will also notice a ball in the centre of the room when he starts casting this. This is a line of sight attack and will one shot you if you are within that line. To avoid it you stand between the ball and a statue. The attack is always from the centre of the room so as long as you watch the cast bar on Anatoboga you can just go hide. After Imminent Catastrophe the far left statue will turn into a demon creature. This should be killed as soon as possible before going back to the boss.
Anatoboga will eventually use Imminent Catastrophe again, and this time the statue on the near right where your ranged attackers are standing will turn into a demon. Kill this but be aware of a new attack the boss will start doing. He will attach a purple line to a random party member (who isn’t the tank) and you have about 5 seconds to run far away before he places a bomb in your location. This bomb will explode repeatedly until the next Imminent Catastrophe so it is important that this spawns far away from the boss. The main reason a party will wipe on this boss is because they failed to avoid this attack.
Assuming you survived this phase the rest of the fight is pretty much the same. However since the statue you were next to has gone you should avoid the next Imminent Catastrophes by using the statue next to the boss. The next statue to turn into a demon will be the near left one, followed by the one next to the boss.
Once the fourth statue has turned into a demon the fight becomes a DPS race. You must kill the boss before the next Imminent Catastrophe goes off or you will wipe as there is nowhere left to hide. As a result you should not attack the fourth demon and just finish off the boss as its health will surely be low. A BLM or SMN limit break at this point can be nice in killing the demon and damaging the boss.
If your DPS players are well geared you will kill the boss before the fourth statue turns into a demon, and can maybe even ignore the third. But this is for experienced players.
Bosses
The Amdapor Keep dungeon contains three bosses, which are Anantaboga, Demon Wall, Psycheflayer. These drop a variety of equipment.Amdapor Keep Maps
Amdapor Keep has 3 maps. We have listed the maps in order of entry. Click on the map for a larger version.Ground Floor
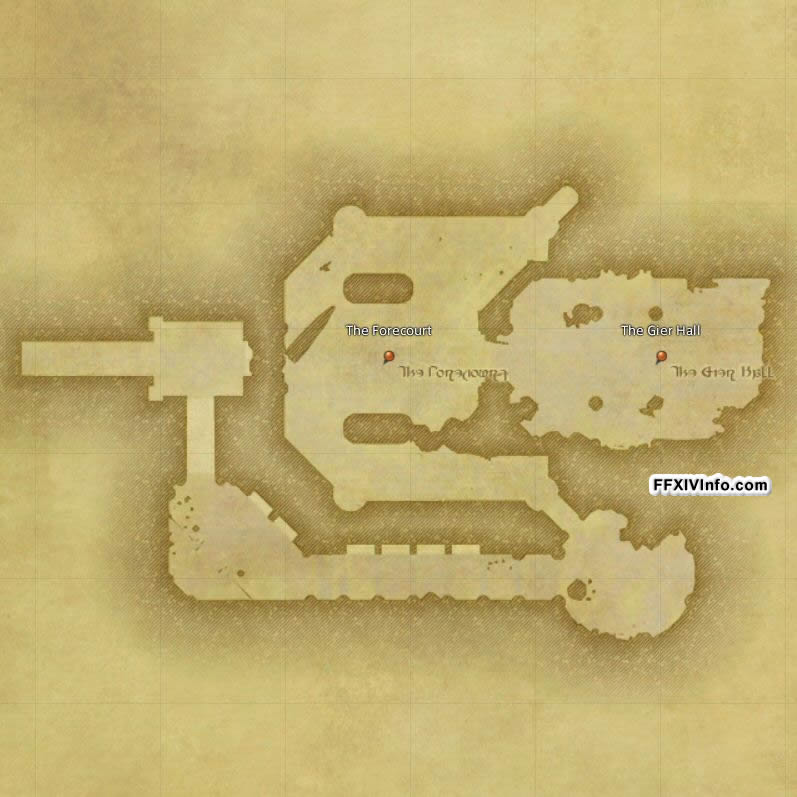
Click for a larger version.
Second Floor
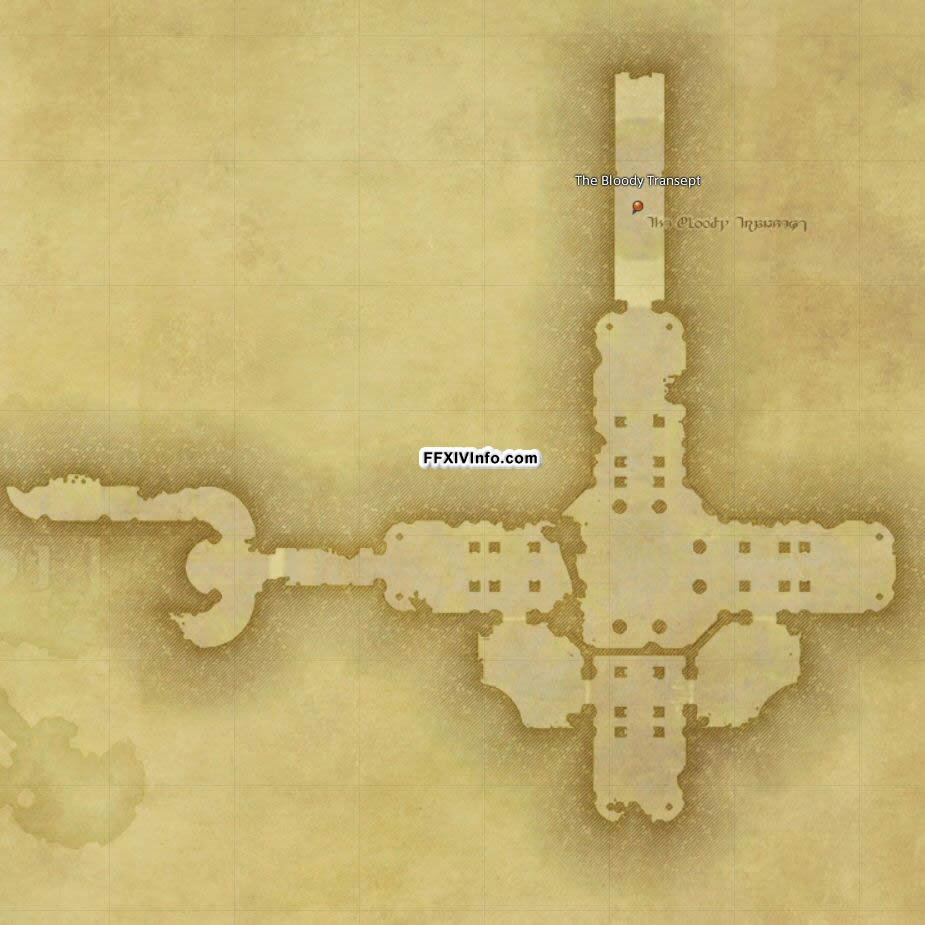
Click for a larger version.
Third Floor
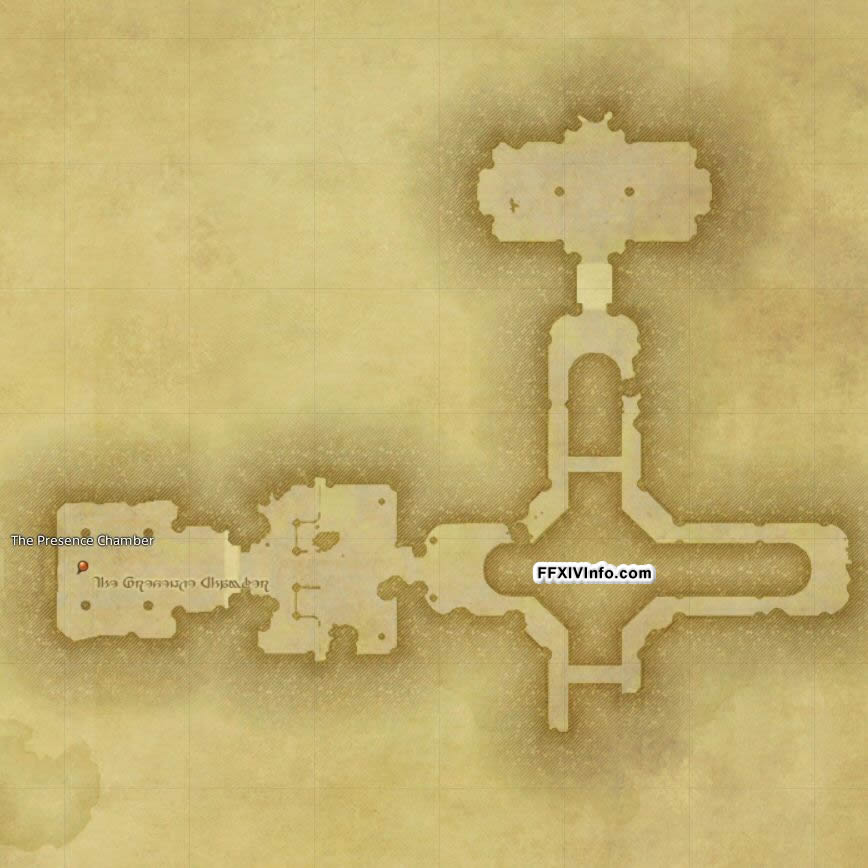
Click for a larger version.
Amdapor Keep Loot List
Below is a listing of all loot for the dungeon Amdapor Keep.| Items () | Stats/Compatibility/Description | Level | iLvl | |
|---|---|---|---|---|

|
Alpine War Jacket GLA MRD LNC PLD WAR DRG DRK GNB RPR | Strength: +15, Vitality: +18, Direct Hit Rate: +24, Tenacity: +17 Chest: Demon Wall | 50 | 55 |

|
Amdapori Stone | A stone slab used by the ancient Amdapori in building construction. | 1 | 50 |

|
Cracks in the Wall Orchestrion Roll | Music roll for Cracks in the Wall. Use to add to your orchestrion list. | 1 | 1 |
|
|
Cracks in the Wall Orchestrion Roll | Music roll for Cracks in the Wall. Use to add to your orchestrion list. | 1 | 1 |

|
Darklight Arquebus MCH | Dexterity: +15, Vitality: +19, Determination: +25, Critical Hit: +18 Chest: Anantaboga | 50 | 55 |
|
Darklight Baghnakhs PGL MNK | Strength: +15, Vitality: +19, Skill Speed: +25, Critical Hit: +18 Chest: Anantaboga | 50 | 55 |

|
Darklight Baselards ROG NIN | Dexterity: +15, Vitality: +19, Direct Hit Rate: +25, Skill Speed: +18 Chest: Anantaboga | 50 | 55 |

|
Darklight Bill MRD WAR | Strength: +15, Vitality: +19, Direct Hit Rate: +25, Skill Speed: +18 Chest: Anantaboga | 50 | 55 |

|
Darklight Composite Bow ARC BRD | Dexterity: +15, Vitality: +19, Determination: +25, Skill Speed: +18 Chest: Anantaboga | 50 | 55 |

|
Darklight Greatsword DRK | Strength: +15, Vitality: +19, Tenacity: +25, Determination: +18 Chest: Anantaboga | 50 | 55 |

|
Darklight Grimoire ACN SMN SCH | Intelligence: +15, Mind: +15, Vitality: +17, Determination: +25, Spell Speed: +18 Chest: Anantaboga | 50 | 55 |

|
Darklight Harpoon LNC DRG | Strength: +15, Vitality: +19, Determination: +25, Skill Speed: +18 Chest: Anantaboga | 50 | 55 |

|
Darklight Kite Shield GLA PLD | Strength: +4, Vitality: +5, Tenacity: +7, Determination: +5 Chest: Anantaboga | 50 | 55 |

|
Darklight Kple Kple CNJ WHM | Mind: +15, Vitality: +17, Determination: +25, Piety: +18 Chest: Anantaboga | 50 | 55 |

|
Darklight Macuahuitl GLA PLD | Strength: +11, Vitality: +14, Tenacity: +18, Skill Speed: +13 Chest: Anantaboga | 50 | 55 |

|
Darklight Planisphere AST | Mind: +15, Vitality: +17, Critical Hit: +25, Piety: +18 Chest: Anantaboga | 50 | 55 |

|
Darklight Square Shield GLA CNJ THM PLD WHM BLM | Intelligence: +4, Mind: +4, Vitality: +4, Direct Hit Rate: +7, Spell Speed: +5 Chest: Anantaboga | 50 | 55 |

|
Darklight Staff THM BLM | Intelligence: +15, Vitality: +17, Direct Hit Rate: +25, Spell Speed: +18 Chest: Anantaboga | 50 | 55 |

|
Demon Brick | We are all better off not knowing what arcane magicks animate this ordinary stone block. Use item to acquire the demon brick minion. | 1 | 1 |

|
Hi-Elixir | 1 | 70 | |

|
Mercenary’s Acton Disciple of War | Dexterity: +15, Vitality: +18, Determination: +24, Critical Hit: +17, Strength: +15 Chest: Demon Wall | 50 | 55 |

|
Mercenary’s Leggings Disciple of War | Dexterity: +9, Vitality: +11, Direct Hit Rate: +15, Critical Hit: +11, Strength: +9 Chest: Demon Wall | 50 | 55 |

|
Mercenary’s Mitts Disciple of War | Dexterity: +9, Vitality: +11, Direct Hit Rate: +15, Critical Hit: +11, Strength: +9 Chest: Psycheflayer | 50 | 55 |

|
Mercenary’s Pot Helm Disciple of War | Dexterity: +9, Vitality: +11, Determination: +15, Critical Hit: +11, Strength: +9 Chest: Demon Wall | 50 | 55 |

|
Mercenary’s Slops Disciple of War | Dexterity: +15, Vitality: +18, Direct Hit Rate: +24, Critical Hit: +17, Strength: +15 Chest: Psycheflayer | 50 | 55 |

|
Paladin’s Darklight Arms (IL 55) GLA PLD | A set of arms containing a Darklight macuahuitl and Darklight kite shield. Required level: 50. IL: 55. | 1 | 1 |

|
Sipahi Crakows Disciple of War | Strength: +9, Vitality: +11, Direct Hit Rate: +15, Determination: +11 Chest: Demon Wall | 50 | 55 |

|
Sipahi Gloves Disciple of War | Strength: +9, Vitality: +11, Skill Speed: +15, Determination: +11 Chest: Psycheflayer | 50 | 55 |

|
Sipahi Sarouel Disciple of War | Strength: +15, Vitality: +18, Direct Hit Rate: +24, Determination: +17 Chest: Psycheflayer | 50 | 55 |

|
Sipahi Shirt Disciple of War | Strength: +15, Vitality: +18, Skill Speed: +24, Determination: +17 Chest: Demon Wall | 50 | 55 |

|
Sipahi Turban Disciple of War | Strength: +9, Vitality: +11, Direct Hit Rate: +15, Determination: +11 Chest: Demon Wall | 50 | 55 |

|
The Sash of the Blind Maiden Disciple of War | Before becoming obsolete due to advancements in tailoring, belts such as this were used for holding up trousers and the like. | 50 | 55 |

|
Vermilion Chain Coif GLA MRD PLD WAR DRK GNB | Strength: +9, Vitality: +11, Tenacity: +15, Direct Hit Rate: +11 Chest: Demon Wall | 50 | 55 |
|
Vermilion Haubergeon GLA MRD PLD WAR DRK GNB | Strength: +15, Vitality: +18, Tenacity: +24, Direct Hit Rate: +17 Chest: Demon Wall | 50 | 55 |

|
Vermilion Skirt GLA MRD PLD WAR DRK GNB | Strength: +15, Vitality: +18, Tenacity: +24, Direct Hit Rate: +17 Chest: Psycheflayer | 50 | 55 |

|
Vermilion Sollerets GLA MRD PLD WAR DRK GNB | Strength: +9, Vitality: +11, Tenacity: +15, Direct Hit Rate: +11 Chest: Demon Wall | 50 | 55 |

|
Warlock’s Hat Disciple of Magic | Intelligence: +9, Mind: +9, Vitality: +10, Critical Hit: +15, Determination: +11 Chest: Demon Wall | 50 | 55 |

|
Warlock’s Pattens Disciple of Magic | Intelligence: +9, Mind: +9, Vitality: +10, Direct Hit Rate: +15, Determination: +11 Chest: Demon Wall | 50 | 55 |

|
Warlock’s Ringbands Disciple of Magic | Intelligence: +9, Mind: +9, Vitality: +10, Direct Hit Rate: +15, Determination: +11 Chest: Psycheflayer | 50 | 55 |

|
Warlock’s Robe Disciple of Magic | Intelligence: +15, Mind: +15, Vitality: +16, Direct Hit Rate: +24, Determination: +17 Chest: Demon Wall | 50 | 55 |

|
Warlock’s Satchel Belt Disciple of Magic | Before becoming obsolete due to advancements in tailoring, belts such as this were used for holding up trousers and the like. | 50 | 55 |

|
Warlock’s Tights Disciple of Magic | Intelligence: +15, Mind: +15, Vitality: +16, Direct Hit Rate: +24, Determination: +17 Chest: Psycheflayer | 50 | 55 |

|
X-Ether | 1 | 70 | |

|
X-Potion | 1 | 70 |